Personal Response to Miki Takahashi
After Studying Miki's Images I was inspired to do two shoots like Oliver's Morris shoot to gain more experience on how to create my own multiple images. On the first shoot I completed was using the model, this would be the basis of the combination of the two images. I was able to achieve different postures from the model, and I used Miki's image as a basis guide for my models facial expression, which I achieved to be very smoothing. Another factor of this shoot was that my model was wearing no makeup this adds to the fact that this is inspired by the thought of using natural sources in my imagery and to show the symbol of Natural Beauty.
Leading on from Natural Beauty I also completed a shoot of the object of flowers. I was able to gain from this shoot many colours, which would help bring my models face to life and really emphasis to fact of delicacy and also the symbol of natural beauty. Also another important factor I achieve from this shoot was collecting a selection of images of different types of flower, this is important because it lets me experiment more with different textures and different compositions, when it comes to combining with the previous shoot.
Overall the two shoot went successful and hopeful my images will show a positive influence from Miki's Images.
Model's Shooting List
- Date: 6th April 2015
- Place: Plain Bedroom Wall
- Time: Early evening
- Lighting: Camera flash
- Subject: The basis image for the combination of the two, object and the model
- Reason: To gain more about the placement and posture of the model
- Problems: Lighting
- Props: Model
Flower Objects Shooting List
- Date: 7th April 2015
- Place: Anstey Memorial
- Time: Before Sunset
- Lighting: N/A
- Subject: The Object (Flower)
- Reason: to learn more ways to create multiple images
- Problems: N/A
- Props: Different Flowers
How To Edit
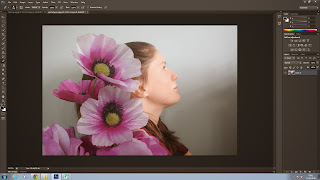
1. Before I combined the model's face images with the flowers I adjusted the lighting levels with photoshop. This even out the skin tone on the models face and also softened the harsh shadows and also lightened up the image, making it look more professional.2. After editing the models face, I opened up the selected flower Image I was going to combine.

3. When the two images were open I layered the flower image over the top of the models face and lower the opacity levels, this made the flower layer almost transparent.
4.When the correct opacity levels were set, using the Photoshop tools I selected the eraser tool on the right hand side and began the remove the unwanted area around the flower.
5. Finally when I had erased all the unwanted area on the flower layer I altered the opacity of the flower so it was more visable to the audience.
Final Edits

Review
After combing these to images I am more convince about the idea of using landscape/natural objects combined with human figures and faces is the best way to represent multiple images. I believe this because when both of the images are combined together they balance each of themselves out, and also tell and mystery story to the audience.
What I admire about this shoot is the involvement of colour in the photos, and the colour beaming from the flower really works well with the pale skin of my model.


No comments:
Post a Comment